
Jun 24, 2026
Most people use project management tools to build a digital list of chores. They create a task, assign it to a human, ping them for updates, and manually push cards across a board.
That isn't a system; it’s digital babysitting.
In Northflow, we’re building a world where you don't manage tasks—you design systems that run themselves. To show you what that looks like in practice, we’ve rolled out our first wave of autonomous AI agents. They don't just track your work; they do it for you.
Here is a step-by-step, screen-by-screen guide to deploying our two newest agents while you have the Northflow platform open.
The Transcriber Agent: Instant Media-to-Text
The Transcriber Agent eliminates the need for separate transcription apps. It operates completely inside your project tasks, automatically handling MP3 or video files.
Do it on Northflow
Create a Project & Task: From your dashboard, click to create a new project and name it (e.g., "Demo"). Inside that project, click to create a new task and name it "Transcription".
Upload Your File: Open the task you just created. Click on Upload, select your video or MP3 file, and click Add to queue.
Assign the Agent: Look at the assignment options—you can do this either from the open task window or directly from the main Project View. Click the assignment dropdown and select the Transcriber agent.
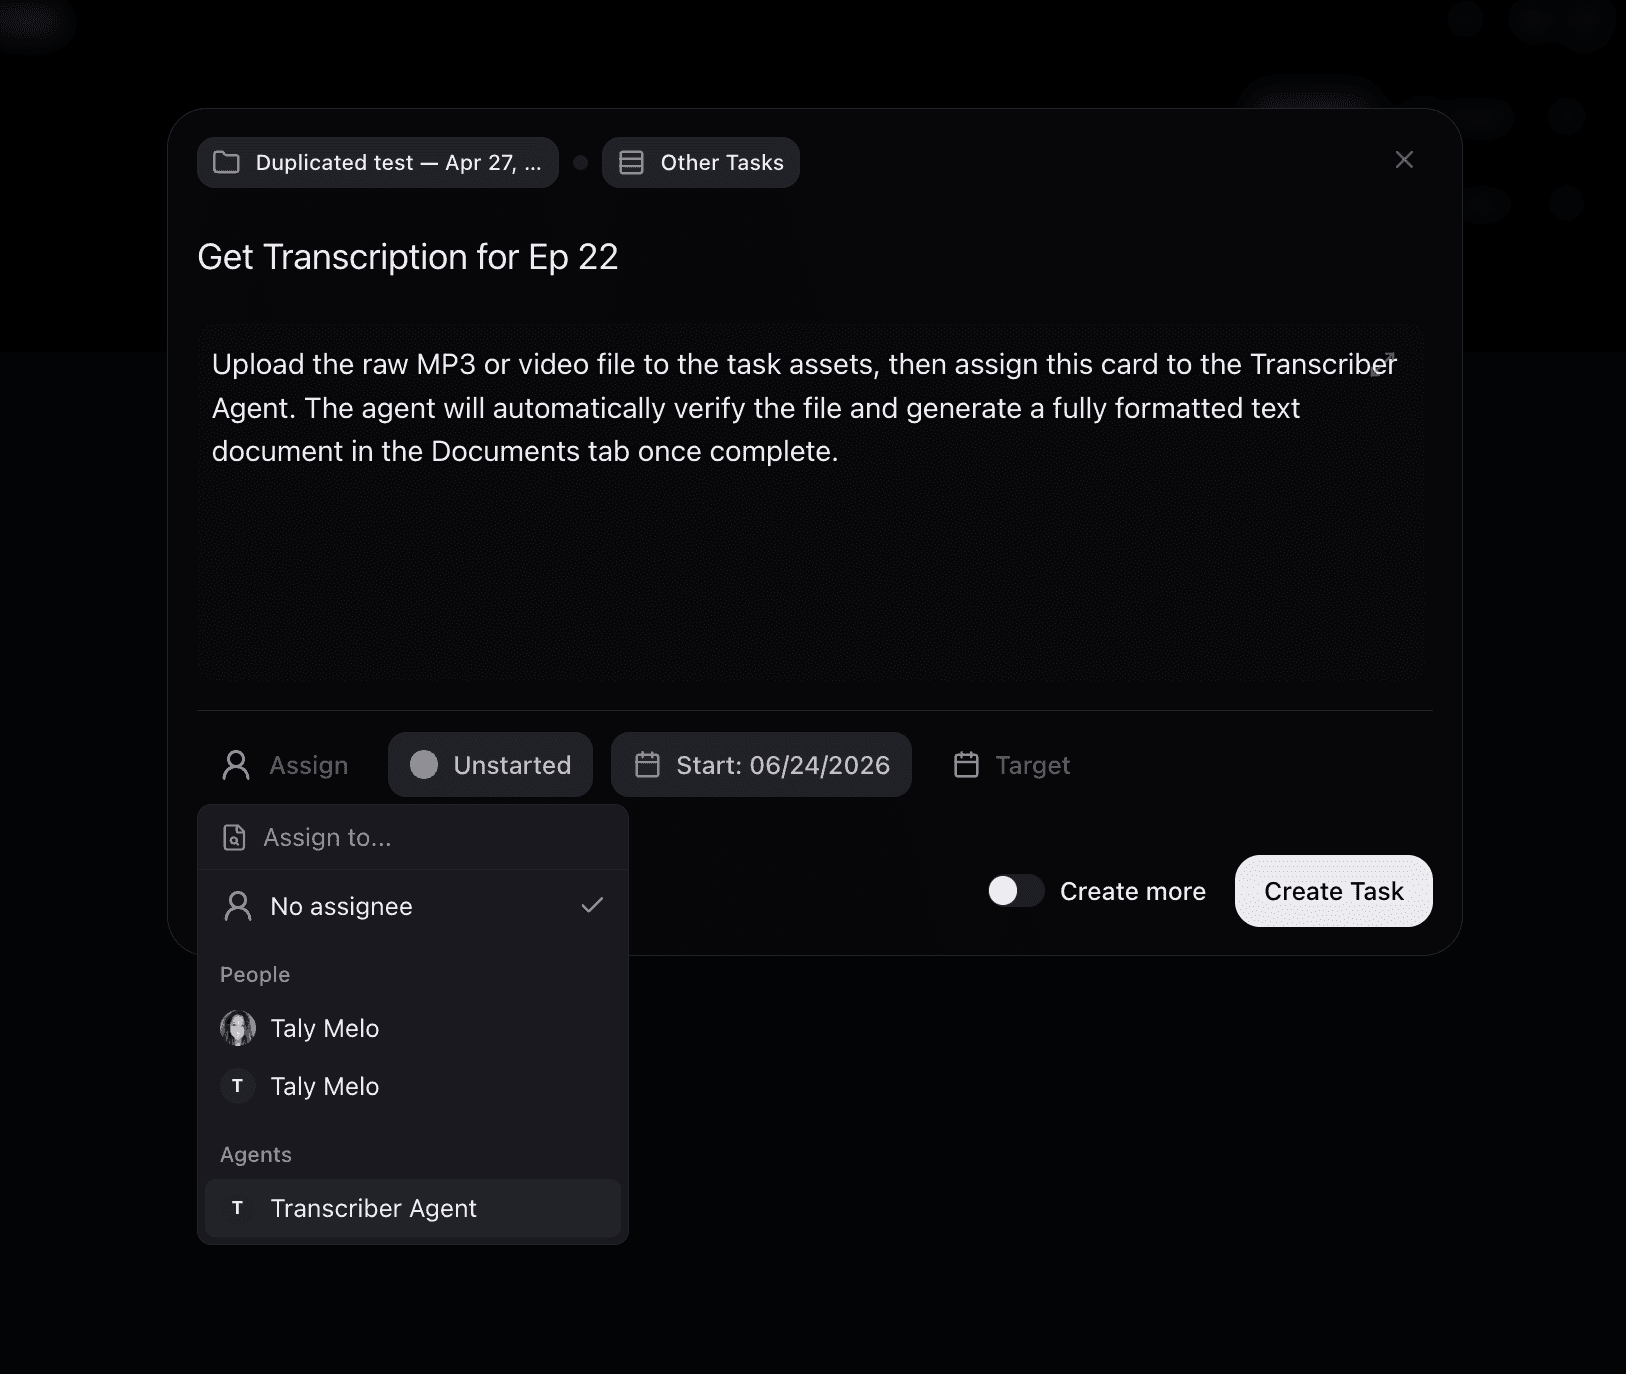
How it works behind the scenes: The moment you click assign, the agent runs an internal validation step to ensure the necessary media assets are present in the task. Once verified, it automatically begins processing.
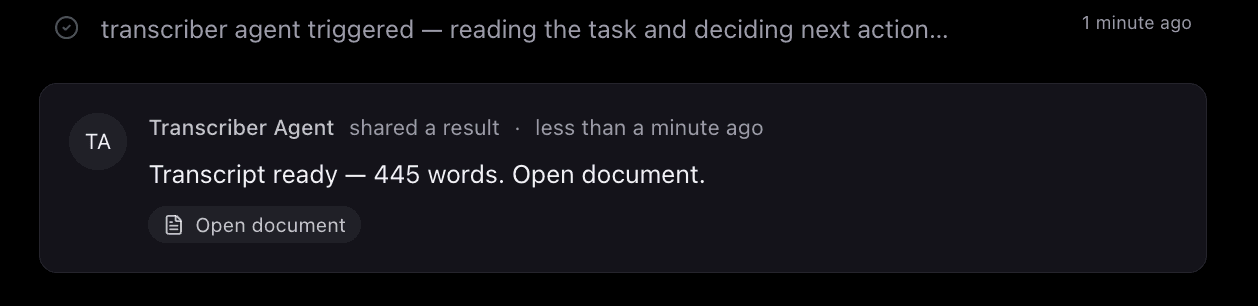
Review the Results: When the agent finishes, you will see a word count confirmation (e.g., "892 words") right on the card. Click over to the Documents tab inside the task to view the full, structured transcription. Because it automatically separates audio channels, single-speaker files will cleanly display as "Speaker 1".
The Guest Recruiter Agent: Outreach on Autopilot
Booking guests for a show involves endless email back-and-forth, follow-ups, and pipeline tracking. The Guest Recruiter Agent manages this entire workflow from introduction to final confirmation. Instead of managing individual tasks for every lead, you build the parameters and let the agent run the system.
Do it on Northflow
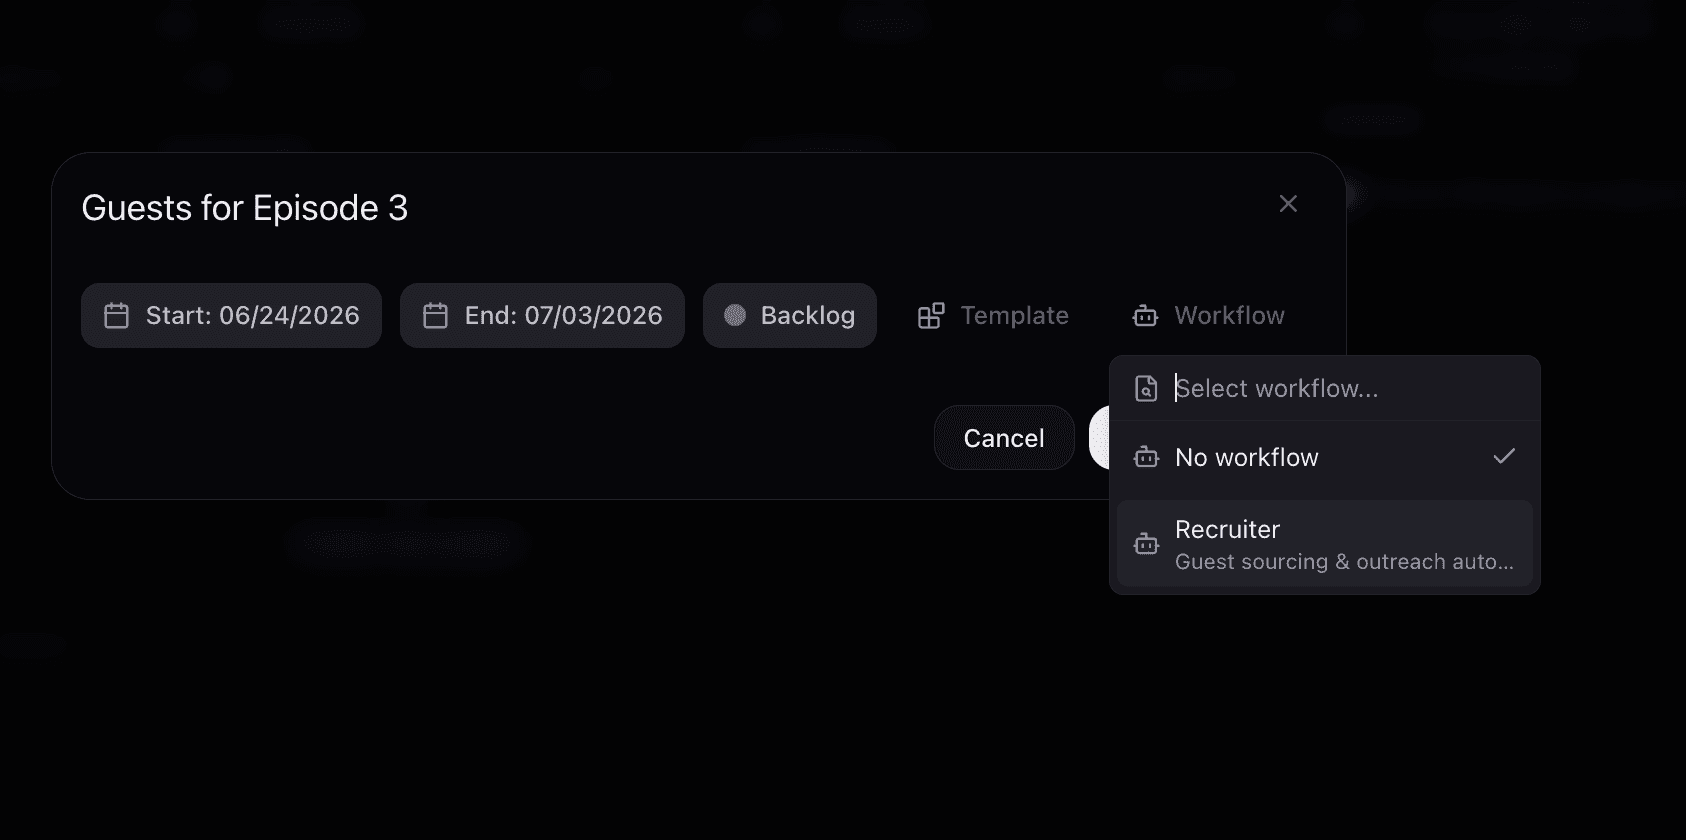
Step 1: Create the Project & Map the Workflow
Click to create a new project and name it (e.g., "Guest Recruiting").
Before hitting create, navigate to the Workflow configuration dropdown within the setup window and select the Recruiter workflow.
Link the Agent's Inbox: The platform will prompt you to select an email inbox for the agent (for example,
spaceandbeyond@northflowmail.com). This gives the agent its own dedicated email identity to send outreach and receive replies.
Step 2: Educate the Agent via the "Briefing"
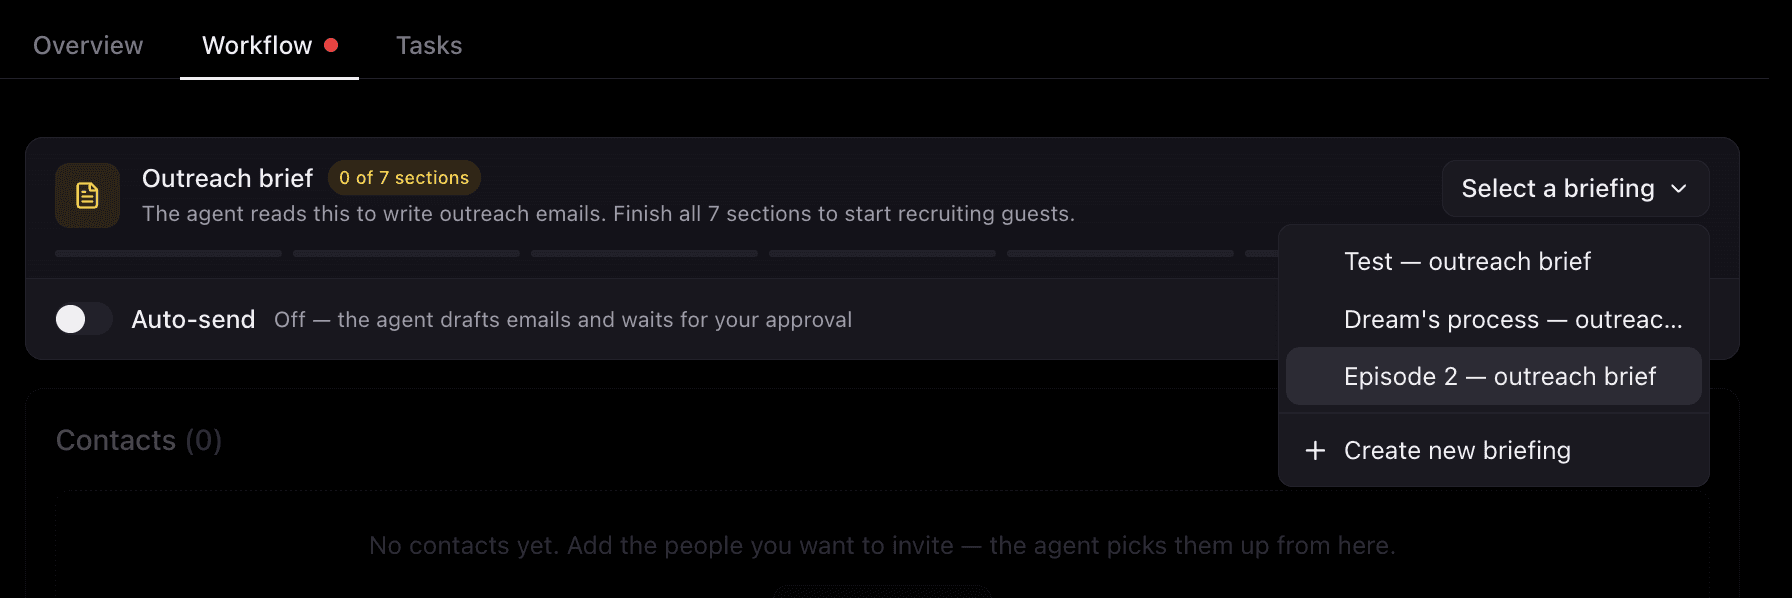
An agent is only as good as its instructions. To tell the agent how to talk to your targets:
Inside your new project, click on Select a briefing.
If you are starting fresh: Click Create new briefing and name it. The platform will take you through a 7-question guided wizard asking about your invitation details, show context, and target audience.
Tip: Click the Use AI to assist you option within the wizard if you want help drafting these parameters dynamically.
Set Your Guardrails: On step 5 of the briefing wizard, fill out the "Things never to say" section to restrict specific topics, competitors, or phrases (e.g., "Never talk about olive"). Add your RSS feed or a reference URL on the final screen and click Done.
If you've done this before: You don't need to recreate the wheel. Simply click an existing saved briefing from your list to instantly apply it to the new project.
Step 3: Set Your Level of Autonomy
Before activating the agent, look for the Auto Send toggle switch on your project dashboard:
Auto-Send ON: The agent will autonomously write, send, and reply to emails to push guests through your pipeline without waiting for you.
Auto-Send OFF (Default & Recommended for getting started): The agent will fully draft every email contextually based on your briefing, but it will save them as drafts and pause, waiting for you to click "Approve" before anything leaves the inbox.

Step 4: Add Contacts and Launch
Navigate to the contact section within the project, click Add a contact, and select your target lead(s) from your list.
Click the Start button.
The agent immediately generates a task for that contact and places them into your visual project pipeline, shifting them automatically based on real-time email interactions:
Backlog —> Conversation —> Closed
Backlog: The agent has fired off the initial outreach email and the system is waiting for the contact to reply.
Conversation: The contact has replied. The agent is actively reading their email, addressing questions based on your briefing, and guiding them to complete your goal (e.g., booking a pre-interview or filling out a form).
Closed: The contact has successfully completed all necessary steps. The agent closes the loop, allowing you to step in only for the actual interview.
What Should We Build Next?
We are continuously adding new capabilities to our lineup of autonomous systems.
If there is a repetitive operational bottleneck in your workflow that needs its own agent, let us know—we want to build it with you!